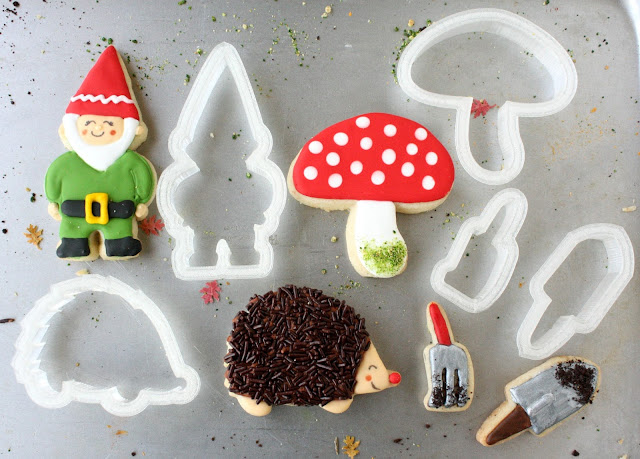
Sue of Munchkin Munchies teaches us how to recreate this adorable fall-themed garden! We wish our gardens would produce such cuteness!
***
I have wanted to make gnome cookies for awhile, and since fall is my favorite season, I thought now would be the perfect time. I'm rather smitten with these gnomes in their pumpkin patch (another favorite thing)! We tried to grow pumpkins in our garden this year, as we have in the past, but this time, the darn gophers got the best of us, and our pumpkin plants disappeared overnight, literally! Big SIGH!
Follow along as Sue of Munchkin Munchies teaches us how to recreate this adorable fall-themed garden! We wish our gardens would produce such cuteness!
Ingredients
- Rolkem silver dust (optional)
- For an easy, no mess option for cookie decorating, try Tipless Piping Bags. Simply cut the tip size you want and discard the bag when you're done. No need for clean up!
Instructions
1. Mix cookie dough and roll out about 3/8-inch thick.
2. Cut out cookies and place on baking sheets. (I usually place the baking sheets in the freezer for 10 minutes before baking to help the cookies hold their shape)
3. Bake according to cookie recipe and allow cookies to cool.
4. Mix up the royal icing and place portions in separate bowls to make the different colors, estimating how much of each color you need. I usually add white gel to the royal icing that will be white because I think it helps to prevent bleeding of just plain, untinted icing and it looks less transparent, but that step is optional.
5. Place the tinted frosting in the decorating bags with the appropriate tips (smaller tips for finer details).
6. To decorate gnomes: With the green, medium consistency frosting, outline the green suit. Next, outline the hat in red or green and fill in. Allow to dry for an hour and then fill in the suit. (If you fill it too quickly you will lose definition on the arms, unless you want to detail it afterwards.) When the hat and suit dry for about an hour, add the white or yellow squiggle detail to the hat. Outline and fill in the beard with the white icing, and the face with the ivory. Add the nose, hands, and ears with the ivory icing. Let dry overnight before adding the facial details with the black and red (cheeks) food markers.
To decorate toadstools: (Of course you can decorate these at the same time as you are decorating the other cookies.) Using red, medium consistency icing, fill in the top part of the toadstool. Immediately add the white dots with tip #1 with the same consistency of icing as the red (wet on wet decorating). Let the red dry for about an hour and then use white icing to outline and fill in the stem. Sprinkle on some of the moss (explained below) mix while it is still wet.
To decorate the hedgehogs: Outline and fill in the head and feet of the hedgehog with the ivory icing. Let it dry for about 20 minutes and then outline and fill in the body of the hedgehog with the brown icing. While it is still wet add the chocolate jimmies. Add the nose with some red icing. Let dry overnight before adding the facial details with the food markers.
To decorate the garden tools: Outline and fill the handles of the tools with the color of your choice. Fill in the bottom part with gray icing (black icing mixed with white). For extra detail, you can add silver dust (mixed with a bit of clear almond extract) and apply it to tools after drying with a small paint brush, used only for food. Add some finely crushed chocolate cookie crumbs to wet tool as "dirt".
To decorate pumpkins: Outline and fill in the pumpkin with orange icing. Decorate the stem with the brown icing. Let dry. Add the vine with the green icing. Add brown shading details to pumpkin with the grown food marker.
To create other decorations: I used a leaf-shaped paper punch tool to produce tiny fall leaves, punched from real leaves! Such an authentic, sweet touch! The "moss" is crushed graham cracker crumbs with some green food coloring added.
To make my cookies stand upright, I attached a small piece of baked sugar cookie to the back of each cookie with the royal icing and let it dry. The small cookie piece was a 90 degree triangle, to adhere to the cookie like a bookend.


