


What's better than Christmas ornaments? Edible Christmas ornaments! Jenessa of @dolcecakesconfections shares her recipe and teaches us how to make these stunning cookie ornaments using CookieCutterKingdom's ornament cutters.
***
Like so many others, one of my favorite holidays of the year is Christmas. I love Christmas not just for the decorations and other typical things about it people love, but because I have such fond childhood memories attached to it. Out of these memories, the one that I always think of is when my grandfather took a bite out of a cookie ornament off of my mother's Christmas tree. To my recollection, the cookie was a simple heart with pink sanding sugar on it, tied off with a red ribbon. The thing must have been at least 3-4 years old and hard as cement, but my Aboo loves cookies so much that he ate it anyways. I want to say my mother hung the cookie up for a few years after, even with the bite out of it just because. I figured this year, since I'm going back home for Christmas, I would make some sugar cookie ornaments to share.
- Sugar cookie dough (CookieCutterKingdom recipe here)
- Cookie Cutter Kingdom's Ornament cutters
- White royal icing, flooding and stiff consistency (CookieCutterKingdom recipe here)
- Edible marker
- Silver luster dust
- Clear alcohol or extract
- Small paintbrush for food only
- Drinking straw or #5 round tip
- Ribbon
- Optional: For an easy, no mess option for cookie decorating, try Tipless Piping Bags. Simply cut the tip size you want and discard the bag when you're done. No need for clean up!
DIRECTIONS:
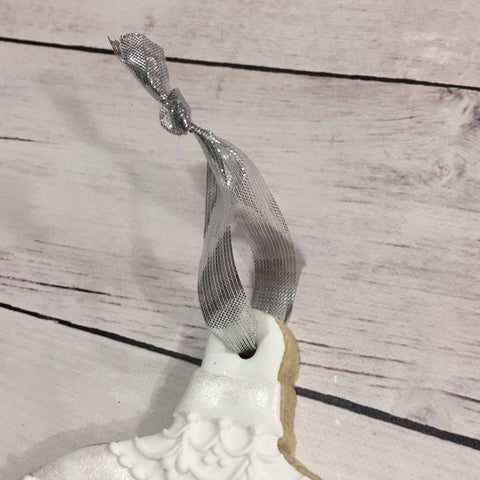
To start, bake off your cookies like you normally would. Immediately after taking them out of the oven, use your #5 round tip or straw to punch a hole in the warm cookies where you would like to hang them from. Make sure not to press too hard or your cookies might split near the edge. If that happens, lightly press the cookie back together so the crack becomes flush with the rest of the cookie. Once the cookie cools down, it should stay in shape and hold after it is iced.


When your cookie has cooled, take an edible marker and draw on some droopy horizontal lines as guidelines. I normally use a light colored marker because the darker colors can bleed into the white sometimes.

Next, pipe and flood in every other section of your cookie using the white royal icing. Depending on how many cookies you're decorating, the alternating sections may be dry enough to fill in by the time you're finished. If not, set your cookies aside or in front of a fan for about 15 minutes or until they are set, and fill in the other sections.


When your cookies are dry, mix the luster dust with a little alcohol or clear extract and paint alternating sections on your cookie.


Take your stiff consistency royal icing and pipe small swags on the solid white sections of the cookie. Pipe on small dots at the points where the swags meet.


Next, pipe larger swags with 2 smaller swags in between them. Don't worry if they're not perfectly symmetrical. There will be plenty of other details to draw your eye away from the discrepancies.Pipe a cluster of 3 dots in between the larger swags.

Then pipe a cluster of 3 tear drop shapes at the outer corners of the larger swags. To do this, start on the outer section and squeeze enough royal icing until you get the size ball you want and gently drag your piping bag towards the top as you release pressure, creating a tear drop shape. I usually pipe the center drop first before the outer ones.
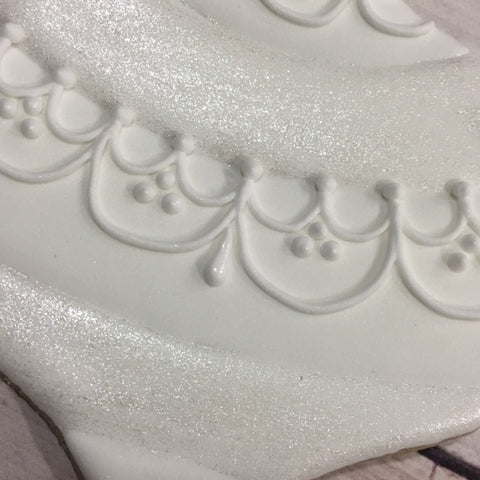

Finish the design by piping a pearl border along the edges of any bare sections. Use the same technique as the tear drop shapes when piping the border, just start the next pearl right after each one.


Now that the decorating is complete, set your cookie aside to dry completely before tying on your ribbon and hanging the cookie up.

Decorating and hanging these cookie ornaments is great alternative activity to do with children instead of building gingerbread houses, especially since these ornaments probably taste way better than those gingerbread kits do!

I wish you all a Merry Christmas and happy holidays from my kitchen to yours.
Xx,
Jenessa