

Ready to start decorating cookies, but not sure where to start? You’re in luck: today we’re sharing our master decorating guide. This article serves as a compilation of all our technique blog posts, giving you the starting point to take on your first big decorating project. We’ve included basic steps below, plus resources for finding more information as you need it. So what are you waiting for? Let’s get baking.
Before you start anything else, bake up a batch of sugar cookies. (We like this recipe best.) Roll out and cut, then bake according to directions, making sure not to let the cookies get too brown in the oven. Remove to a baking rack and allow to cool completely.

Next, mix up royal icing and powdered sugar glaze. For best results, we like to use our royal icing recipe and our favorite powdered sugar glaze. If you’re in a rush or will eat your cookies in a day or two, you can make the royal icing recipe, fill your piping bags, and then thin out the remainder with a little extra water. After it reaches the desired consistency, just add your flavoring (like in this recipe). The downside to this method is that it’s difficult to get exactly the same color of royal icing and glaze. If color difference doesn’t matter, though, this is a great pinch-hit!
Next, add your coloring of choice. If you will be using different colors of icing, try separating out your glaze (or royal icing) before adding color with gel dyes or liquid food coloring. We prefer gel dyes for their wider range of colors and thicker consistency, but use whatever you feel more comfortable with. If you need more information on coloring icing, we go in-depth here.
Then, when you’re ready, make and fill your own frosting bags with royal icing. You can use plastic disposable or reusable frosting bags too, but we prefer the versatility of our DIY waxed-paper ones. Make them as big or as small as you need, and don’t worry about cleaning frosting, flavoring, or dye out once you finish your decorating project.
Finally, gather together any additional decorations you’ll need. For this tutorial, we’ll just pipe and glaze the cookies before topping them with sprinkles, but it’s easy to get creative. You can add contrasting details with other royal icing colors, sanding sugars, or even hand-sculpted toppers. Don’t limit the cookie decorating possibilities!
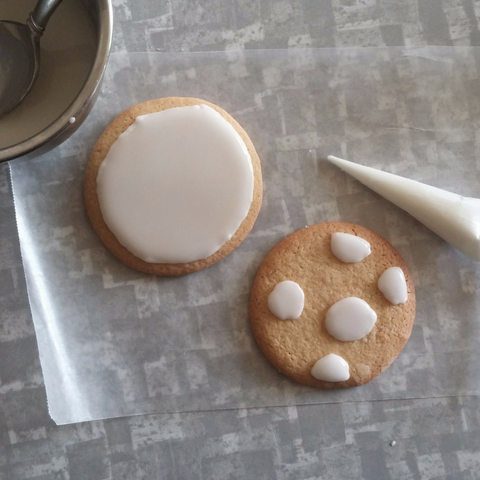
Once everything is assembled, it’s easy to start pulling things together. First, pipe royal icing onto your cookie, squeezing the icing from the twisted end down, just like we do in this post. You can outline the whole area if you’ll glaze it one color or create multiple different spots for different colors of glaze. Whatever you do, make sure your royal icing makes firm contact with the cookie—if it’s loose or too thin, the glaze might run past it, making a big mess and more rustic presentation.

After your royal icing is in place, use a spoon to gently drop powdered sugar glaze into the outlined area. Start small and add more glaze as needed, tipping the cookie to help it flood the area. It’s easy to add extra glaze, but fixing a frosting overflow is frustrating and difficult. Take your time and enjoy coloring between the lines, or read here for more detailed instructions.

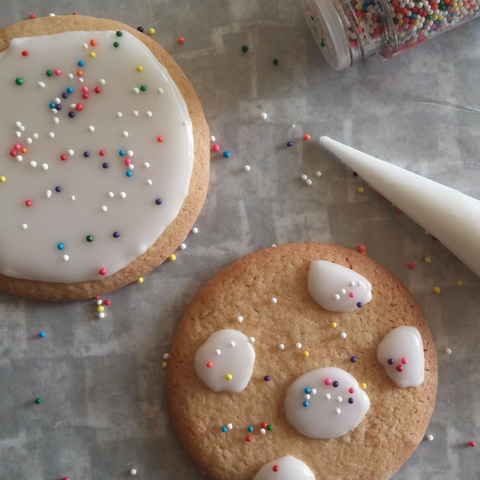
The last step is the most fun: adding decorations! If you’re using sprinkles or other toppings, add them now while the glaze is still wet. If you’re adding another layer of royal icing or glaze, let this coating harden and dry for at least 8 hours and perhaps up to 24, depending on the consistency and color of the first layer of glaze. If you’ll be topping a light color with a very dark or saturated one, make sure that the glaze is totally dry to prevent the color bleeding into the bottom one. In the meantime, read our suggestions on new ideas for using royal icing, and when you’re ready, decorate away!
Need inspiration on how to decorate your cookies? Follow us on Pinterest and Instagram for weekly ideas from bakers around the world.